Since December hit, the weather here in Beijing has turned bitterly cold, and unfortunately, the flu season hit our household hard. I spent a week with a high fever, followed by my husband, and finally, my son.

As a mother and a chef, the hardest part wasn’t being sick myself; it was watching my little boy lose his appetite. For days, he barely ate. But the moment his fever broke, he looked at me and asked for one specific thing: Meat Floss Bread.
I didn’t hesitate. I went straight to the kitchen. When these savory, golden buns came out of the oven, he ate a whole one immediately. Seeing his appetite return was the best relief I could ask for.
This recipe produces a bread that is incredibly soft, holds its shape beautifully, and is packed with the savory-sweet combination of mayonnaise and pork floss (rou song) that makes Asian bakeries so famous.
What are Pork Floss Buns?
Pork Floss Buns, or Rousong Mianbao (肉松面包), are a staple in Chinese bakeries from Shanghai to San Francisco.

If you are new to Chinese baking, you might be wondering: What is Pork Floss? Pork floss, or Rousong, is dried pork that has been stewed, shredded, and roasted until it looks like fluffy cotton wool. It is savory, slightly salty, and often has a hint of sweetness. It dissolves in your mouth and is packed with umami.
In this recipe, we pair it with a soft, slightly sweet milk bread dough and rich mayonnaise. It creates a flavor profile that is distinctively Chinese: a perfect balance of sweet dough and savory toppings.
Why This Recipe Works
- Beginner-Friendly Dough: This dough is formulated to be “three-dimensional”—meaning it holds its shape well during proofing and baking, making it easy for novices to roll into perfect logs.
- Double Mayo Technique: We apply mayonnaise both before baking (to melt into the bread) and after baking (for fresh creaminess).
- High Hydration Feel: By using a specific ratio of milk and eggs, we achieve a texture similar to Tangzhong (water roux) bread without the extra step of cooking the flour paste.
Key Ingredients & Substitutions
- High-Gluten Flour (Bread Flour): You must use bread flour (protein content above 12%) to get that signature chewy, shreddable texture. All-purpose flour will result in a denser bun.
- Pork Floss (Rousong): You can find this at any Asian grocery store. There are two main types: “fluffy” (more cotton-like) and “crispy” (often with sesame seeds/seaweed). For this recipe, the fluffy kind (often labeled “Sung”) works best. See also our guide on Pork Jerky and Pork Floss Bread for more ways to use this ingredient.
- Mayonnaise (Salad Dressing): In China, we refer to this as “salad sauce.” I strongly recommend using Kewpie Mayonnaise (Japanese mayo) for its rich, eggy flavor. American mayo is a bit more acidic but works in a pinch.
- Yeast: Instant yeast is preferred here as it can be mixed directly with the flour. If using Active Dry, activate it in the warm milk first.
Ingredients
For the Dough:
- 2 cups (250g) Bread Flour (High-gluten flour)
- 2 tbsp + 1 tsp (30g) Granulated Sugar
- 1 Large Egg (approx. 50g)
- 1 tsp (3g) Instant Yeast
- ½ tsp (3g) Salt
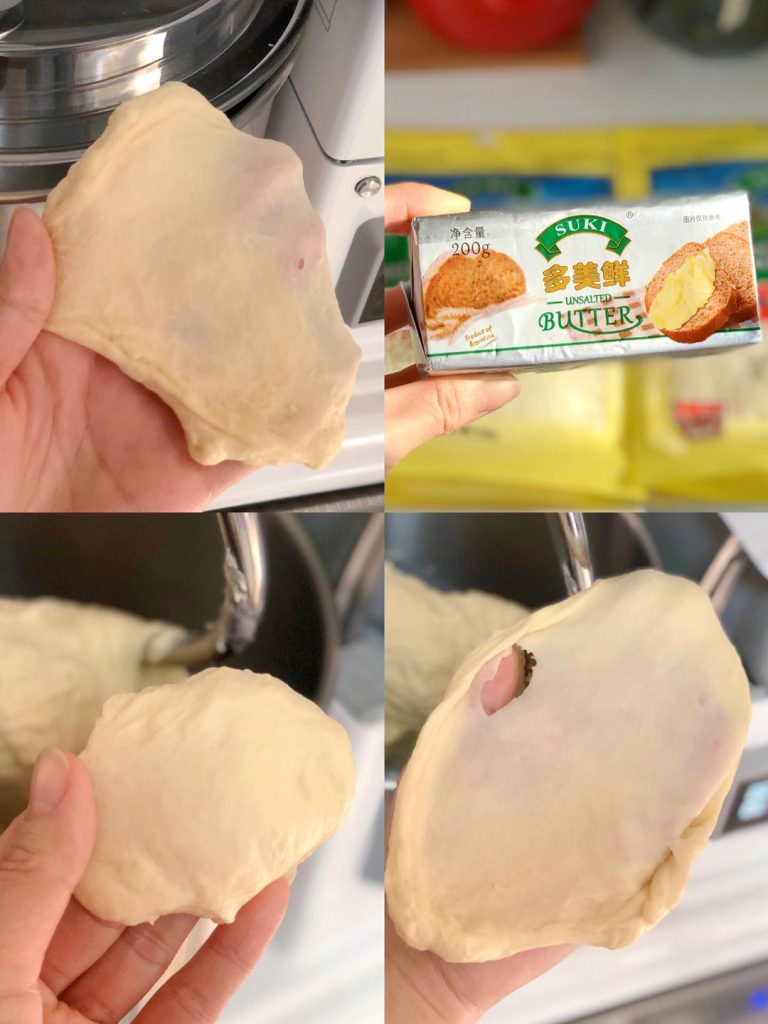
- 2 tbsp (30g) Unsalted Butter, softened
- ½ cup (120ml) Whole Milk (See Note 1)
For Toppings:
- 1 Egg (beaten, for egg wash)
- 1 cup Pork Floss (Meat Floss / Rousong), or as needed
- ¼ cup Mayonnaise (Salad Dressing), or as needed
Recipe Notes Before We Begin
Equipment: I use a stand mixer to save effort, but this can be kneaded by hand. You will also need a kitchen scale for accuracy.
Temperature Matters: Make sure your butter is softened at room temperature. However, if your kitchen is very warm, keep the milk cold to prevent the yeast from fermenting too fast during kneading.
Liquid Adjustment: Flour absorbency varies by brand and humidity. The total weight of the liquid (Egg + Milk) should be around 180g. If your egg is smaller, add a splash more milk.
How to Make Pork Floss Buns
Step 1: Knead the Dough
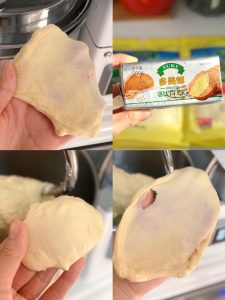
In the bowl of your stand mixer, combine the bread flour (250g), sugar (30g), and instant yeast (3g). Whisk lightly to mix. Add the egg (1 large) and milk (120ml).
Start the mixer on low speed. Knead until the dough comes together and you can pull a “rough glove film” (meaning the dough stretches but breaks easily with jagged edges).
Add the softened butter (30g) and salt (3g). Continue kneading on medium speed. The dough will look slippery at first, but keep going. Knead until the dough is smooth, elastic, and passes the Windowpane Test (it creates a thin, translucent membrane when stretched without tearing).
Chef’s Note: Why add butter later? Fat inhibits gluten formation. By developing the gluten structure first and adding fat later, we get a higher rising, fluffier bread.
Step 2: First Proof
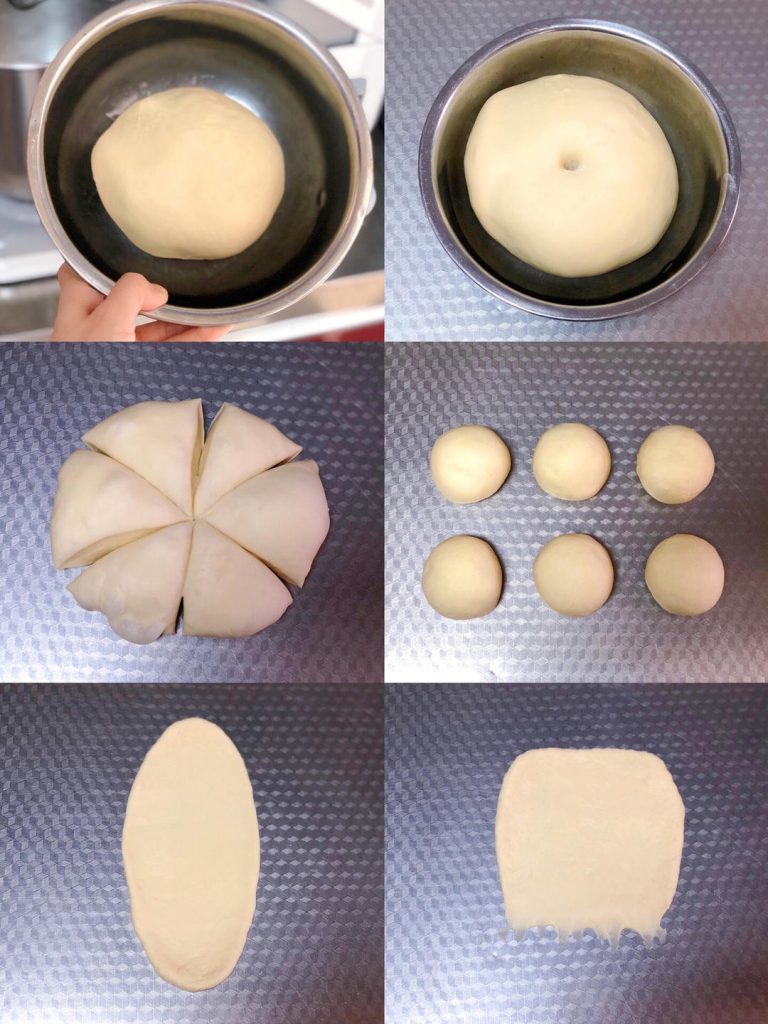
Shape the dough into a smooth round ball. Place it in a lightly oiled bowl, cover with plastic wrap, and let it ferment in a warm place until it doubles in size (about 1 hour, depending on room temp).
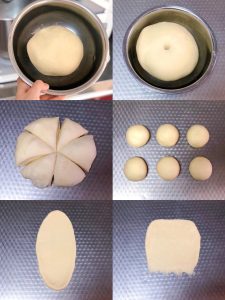
Once proofed, gently punch down the dough to release air. Divide it into 6 equal portions (approx. 80g each). Round each piece into a ball, cover with plastic wrap, and let them rest (bench proof) for 20 minutes. This relaxes the gluten so they are easier to roll out.
Step 3: Shaping
Take one portion of dough and use a rolling pin to roll it into a long oval (tongue shape). Roll from the center up, then center down.
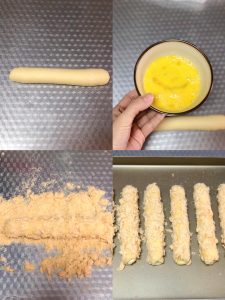
Flip the dough over (smooth side down). Press the bottom edge thin against the table (to help seal). Roll the dough down from top to bottom into a tight log or cigar shape.
Step 4: Coating and Second Proof
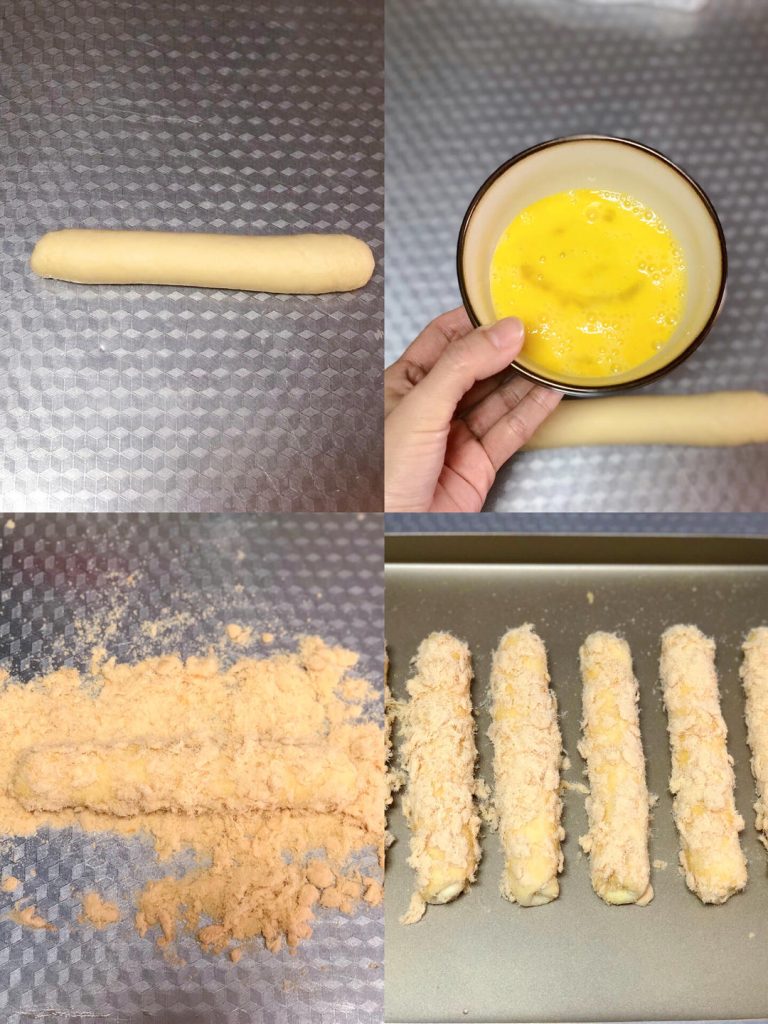
Roll the log on the counter slightly until it is about 8 inches (20cm) long.
Brush the surface of the dough log with a thin layer of egg wash. Immediately roll the dough in a tray of pork floss, coating it generously.
Place the coated buns on a parchment-lined baking sheet, leaving space between them for expansion.
Pro Tip: Coating the dough before the second rise ensures the pork floss adheres perfectly and toasts slightly in the oven for extra aroma. For a different texture, check out ourHomemade Spring Roll Wrappersrecipe which uses a similar “coating” concept.
Step 5: Second Proof & Baking
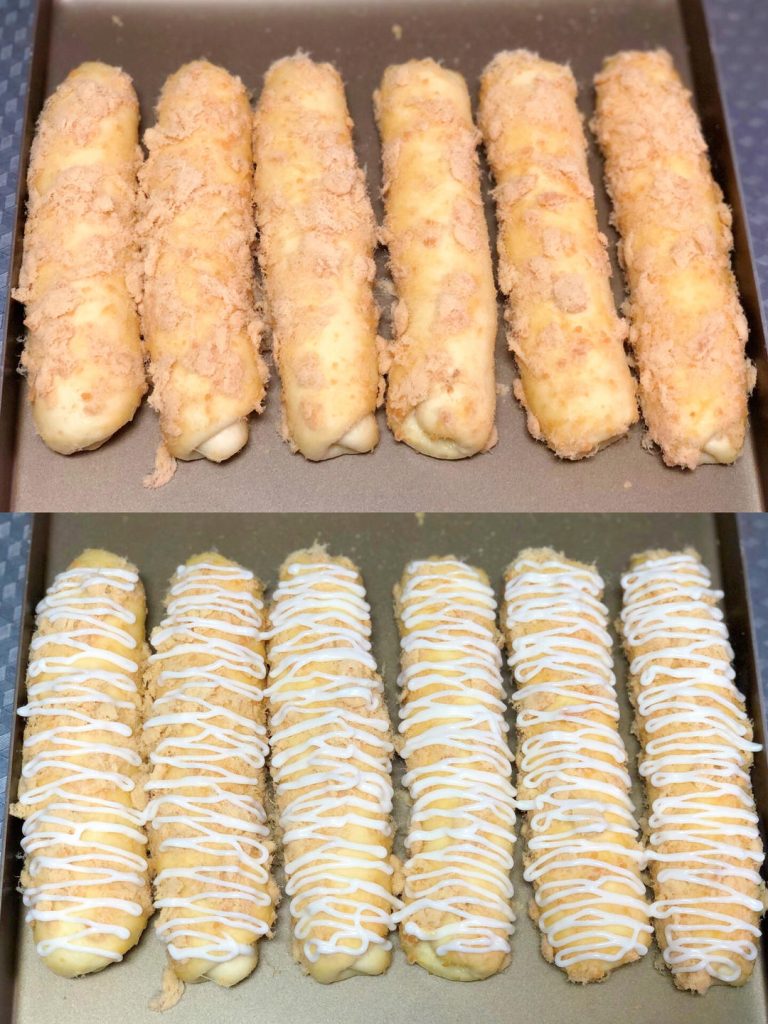
Let the buns proof in a warm, humid place until they grow to about 1.5 times their original size.
While they are proofing, preheat your oven to 340°F (170°C).
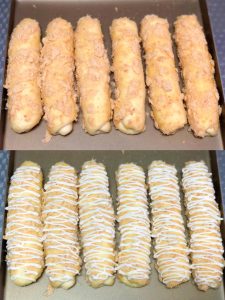
Just before putting them in the oven, squeeze a zig-zag line of mayonnaise across the top of each bun.
Step 6: Bake
Bake in the middle rack of the preheated oven at 340°F (170°C) for 10 minutes.
Then, increase the temperature to 355°F (180°C) and bake for another 10 minutes to get a golden color.
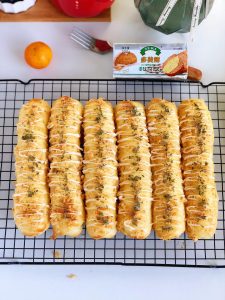
Remove from the oven and transfer to a wire rack.
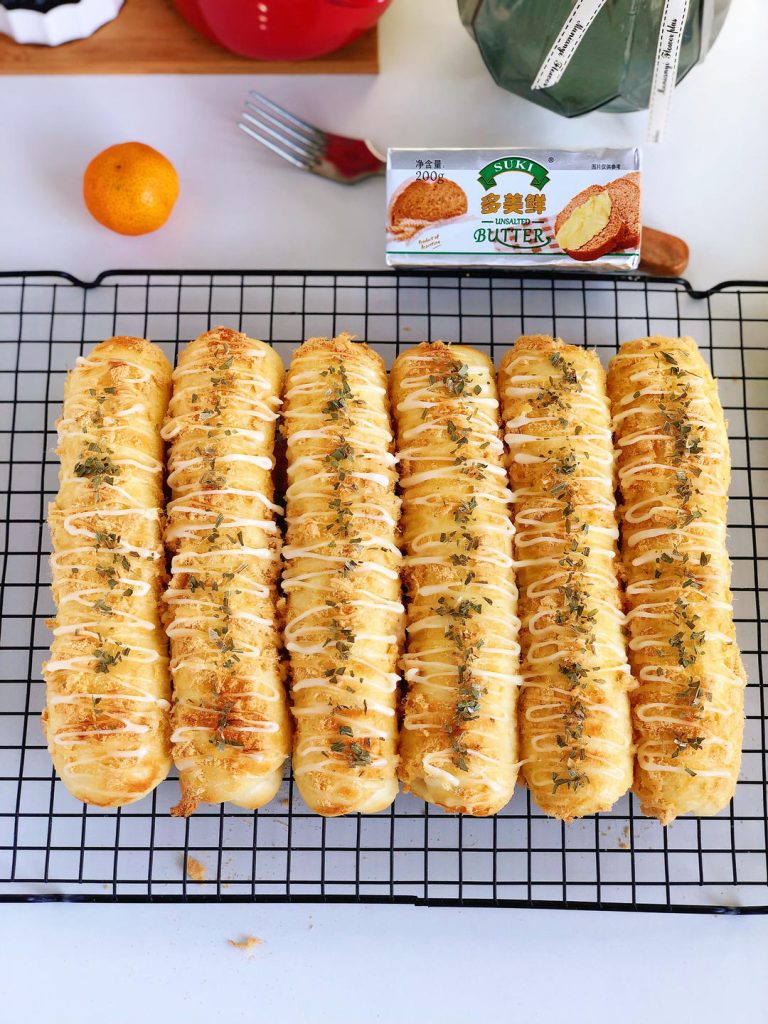
Step 7: Final Touch
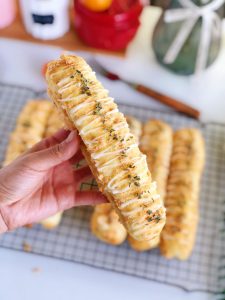
While the bread is still hot, squeeze another generous layer of mayonnaise on top. The heat will slightly melt the sauce, making it incredibly savory and rich.
Let them cool slightly before eating—the internal crumb is delicate and needs a moment to set.

Troubleshooting & FAQ
My dough is too sticky to handle.
This is normal for soft Asian breads. Do not add excessive flour, or the bread will be dry. Use a bench scraper to handle the dough, or lightly oil your hands.
The pork floss is burning in the oven.
If your oven runs hot, the pork floss might darken too fast. If you see this happening, tent the buns loosely with aluminum foil after the first 10 minutes of baking.
Can I add cheese?
Absolutely! As mentioned in my family story, sometimes I sprinkle Mozzarella cheese on top before baking for a pizza-like variation.
Why is my bread hard the next day?
This usually means it was overbaked or not stored correctly. Ensure you don’t bake longer than 20 minutes total. Store in an airtight container once fully cooled.
How to Store and Reheat
- Storage: These buns are best eaten fresh but can be stored in an airtight container at room temperature for up to 2 days. Because of the mayonnaise and meat floss, if you live in a hot/humid climate, it is safer to store them in the fridge after 24 hours.
- Freezing: You can freeze the baked buns (without the final fresh mayo drizzle) for up to 1 month. Wrap individually in plastic wrap.
- Reheating: Microwave for 15-20 seconds for that “fresh from the oven” softness. Do not use a toaster, or the pork floss will burn.
Nutrition Information (Per Bun, Estimate):
- Calories: 380 kcal
- Carbohydrates: 42g
- Protein: 12g
- Fat: 18g
- Saturated Fat: 8g
- Cholesterol: 65mg
- Sodium: 420mg
- Potassium: 110mg
- Fiber: 1g
- Sugar: 8g
- Calcium: 40mg
- Iron: 1.5mg
Food Safety & Allergens:
- Contains: Wheat (Gluten), Egg, Milk (Dairy), Soy (from Pork Floss/Mayonnaise).
- Pork Safety: Ensure the pork floss used is from a reputable source and sealed properly.
- Baking Temperature: The bread must reach an internal temperature of 190°F (88°C) to be considered fully cooked.
- Mayonnaise Safety: Since mayonnaise is applied after baking, ensure the buns are consumed within 24 hours if left at room temperature (below 70°F/21°C), or refrigerated immediately to prevent spoilage.
Recipe Notes
Yeast Activation: If using Active Dry Yeast instead of Instant Yeast, you must dissolve it in the warm milk (110°F/43°C) with a pinch of sugar and let it sit for 5-10 minutes until foamy before mixing with the flour. Dough Consistency: This is a high-hydration enriched dough. It will feel tacky. Do not add excessive flour during kneading, or the buns will become dense. Use a bench scraper to help handle the dough. Pork Floss Adhesion: Brushing the egg wash and rolling the dough in pork floss before the final proof is the secret to getting a thick, even coating that doesn’t fall off. Storage: Store in an airtight container at room temperature for up to 2 days. For longer storage, freeze the baked buns (without the final mayo topping) for up to 1 month. Reheat in the microwave for 15 seconds.
Authoritative References
Safe Minimum Internal Temperature Chart for Breads & Meats:
USDA Food Safety and Inspection Service: Safe Minimum Internal Temperature Chart
Nutritional Value of Pork Products (Pork Floss Reference):
USDA FoodData Central: Pork Products Nutrition Data
Home Baking Food Safety Guidelines:
FDA (U.S. Food & Drug Administration): Handling Flour Safely
Final Thoughts
There is something healing about the smell of baking bread. Even though this recipe came from a moment of worry when my son was sick, it is now a happy memory of recovery and appetite returning. The combination of the fluffy crumb, the salty pork floss, and the sweet creamy mayo is pure comfort.
If you enjoy this savory baking project, you might also like trying our Sesame Paste Flatbread for another classic Chinese flour-based treat!
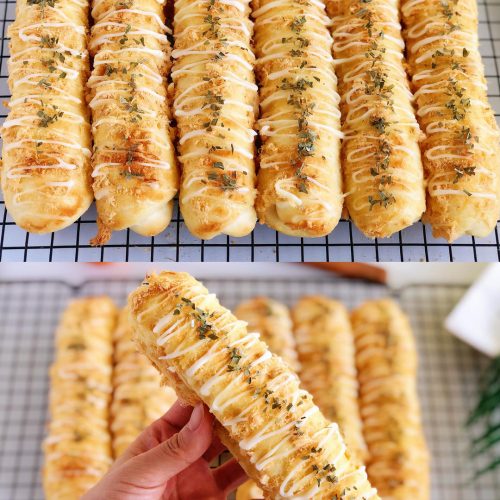
Pork Floss Buns (Rousong Mianbao)

Equipment
- Stand mixer
- Baking Sheet
- Rolling Pin
Ingredients
The Dough
- 250 g Bread Flour (High-gluten flour) approx. 2 cups
- 30 g Granulated Sugar approx. 2 tbsp + 1 tsp
- 1 Large Egg approx. 50g
- 3 g Instant Yeast approx. 1 tsp
- 3 g Salt approx. 1/2 tsp
- 30 g Unsalted Butter softened
- 120 ml Whole Milk approx. 1/2 cup
The Toppings
- 1 Egg beaten, for egg wash
- 1 cup Pork Floss (Rousong) Golden Pork Floss preferred
- Mayonnaise / Salad Dressing Kewpie brand recommended
Instructions
- In a stand mixer bowl, combine bread flour, sugar, and yeast. Add the egg and milk. Knead on low speed until a rough dough forms (rough glove film stage).

- Add the softened butter and salt. Knead on medium speed until the butter is fully absorbed and the dough passes the windowpane test (smooth and elastic).
- Shape dough into a ball, place in a bowl, cover, and let proof until double in size (approx 1 hour).
- Punch down the dough to degas. Divide into 6 equal portions (approx 80g each). Round them into balls, cover, and rest for 20 minutes.
- Roll each ball into a long oval. Roll it up from top to bottom into a log (cigar shape). Extend the length to about 8 inches (20cm).
- Brush the dough log with egg wash, then roll it in the pork floss to coat completely. Place on a baking sheet.
- Let rise in a warm place until 1.5x in size. Preheat oven to 340°F (170°C). Squeeze a line of mayonnaise over the top of the buns.
- Bake at 340°F (170°C) for 10 minutes, then increase heat to 355°F (180°C) for another 10 minutes until golden.
- Remove from oven and immediately squeeze another layer of mayonnaise on top while hot. Cool on a wire rack.
Notes
Safe Minimum Internal Temperatures (USDA)
Nutritional Data Sources (USDA)



Leave a Reply