I still remember the first time I tried to make meat floss (ròusōng, 肉松) the traditional way. I stood over a hot wok for nearly an hour, constantly stirring to dehydrate the meat without burning it. My arm felt like it was going to fall off! Growing up in Sichuan, my chef father always insisted on doing things the “proper” way, but as a busy mom, I knew there had to be a better solution.

After much experimentation in my own kitchen, I discovered the microwave method. It sounds unconventional—and my dad might raise an eyebrow at first—but the results are undeniable. The microwave dehydrates the meat fibers efficiently from the inside out via molecular friction, cutting the active cooking time significantly while retaining that signature savory flavor.
This recipe is a game-changer. It’s cleaner, faster, and gives you complete control over the ingredients (no preservatives or excessive MSG!). Whether you call it pork floss, beef floss, or “meat wool,” this pantry staple adds a savory umami kick to everything from morning congee to baked goods.
What is Meat Floss (Rousong)?
Meat floss, or Rousong, is a dried meat product with a light, fluffy texture similar to coarse cotton candy. It is incredibly popular across China and Southeast Asia. It’s savory, slightly sweet, and packed with umami.

Traditionally, it is made by stewing cuts of pork, beef, or chicken until they are fall-apart tender, shredding them, and then slowly drying them in a wok until all moisture is evaporated. In this recipe, we keep the traditional flavor profile but modernize the drying technique.
You’ve likely seen it topping savory soy milk breakfasts or used as a filling in bakeries. It is the star ingredient in my Pork Floss Buns, a bakery classic that my son absolutely loves.
Why This Recipe Works
- Speed & Efficiency: Using a microwave reduces the drying time from 45+ minutes of constant stirring in a wok to short, manageable intervals.
- Texture Control: We use a food processor (or blender) to break down the fibers, ensuring a fluffy, delicate texture rather than hard, jerky-like chunks.
- Versatility: While I prefer beef for its intense flavor, this method works perfectly with pork or chicken.
Key Ingredients & Substitutions
- Beef (or Pork/Chicken): The original recipe suggests beef (lean cuts like round or flank work best) for the deepest flavor. If using pork, choose lean loin; for chicken, use breast meat.
- Note: Avoid fatty cuts like pork belly, as the fat prevents the floss from drying out properly and can go rancid.
- Aromatics (Scallion & Ginger): Essential for blanching and boiling the meat to remove any gamey odors.
- Light Soy Sauce: Provides the salty, savory base. You can use brands like Pearl River Bridge or Kikkoman.
- Sugar: Adds the signature sweetness that balances the salt. White sugar works best for a cleaner flavor.
- Five Spice Powder: The soul of the dish. It adds that distinct Chinese aroma.
- Shaoxing Wine: Used during the boiling process.
- Substitute: Dry sherry or just omit it if you cannot consume alcohol.
Equipment Needed
- Microwave: The engine of this recipe.
- Microwave-safe dish: A wide, flat glass or ceramic dish is best for even heat distribution. Safety Note: Never use metal bowls or utensils inside the microwave.
- Food Processor / Blender: To shred the meat finely. If you don’t have one, you can shred by hand or use a stand mixer with a paddle attachment, though it takes longer.
- Pressure Cooker (Optional): To speed up the initial boiling step.
Recipe Notes Before You Begin
- Cutting the Meat: Unlike stir-fries where we slice against the grain for tenderness, for meat floss you must cut the raw meat with the grain. This ensures you get long, distinct fibers that fluff up beautifully. If you cut against the grain, the meat will crumble into powder during the shredding process.
- Choosing the Right Cut: Lean meat is non-negotiable here. Fat does not dehydrate well and can go rancid quickly. For beef, use round or flank; for pork, use loin or tenderloin; for chicken, use breast meat.
- Microwave Power Variance: Every microwave is different. The times listed in the recipe are based on a standard 1000W microwave. If yours is more powerful, reduce the intervals. If the meat isn’t drying after the suggested time, keep going in 1-minute bursts—it will get there.
- Texture Control: For toddlers or the elderly, process the meat longer in the blender for a finer, powdery texture that is easier to swallow. For adults, a coarser texture (shredding by hand or minimal blending) often provides a better mouthfeel.
How to Make Homemade Meat Floss
Step 1: Prep and Soak the Meat
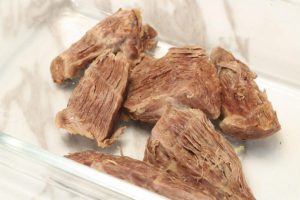
Cut your 14 oz (400g) of beef (or pork/chicken) into large chunks. If using beef, cut with the grain. If using pork or chicken, leave them in larger chunks to prevent them from disintegrating too early.
Place the meat in a large bowl of cold water and soak for 2 hours. Change the water once halfway through.
Why? Soaking removes residual blood and impurities, resulting in a cleaner-tasting final product. If you are short on time, you can skip this, but you must skim the scum diligently during boiling.
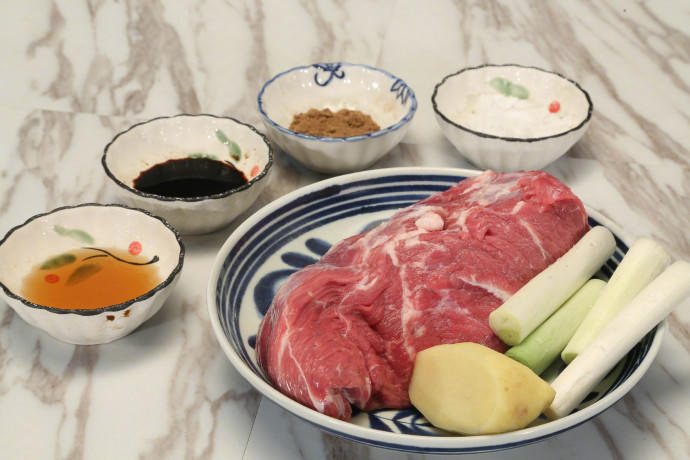
Step 2: Cook Until Tender
Place the meat in a pot with cold water. Add the scallions, ginger slices, and 1 tbsp (10g) Shaoxing wine.
- Stove Top: Bring to a boil, skim off any foam, cover, and simmer. Beef takes about 40 minutes; pork takes 30 minutes; chicken takes 20 minutes.
- Pressure Cooker: High pressure for 15-20 minutes.
Test for doneness: The meat is ready when you can easily crush a piece between your thumb and forefinger. Be careful, it’s hot!

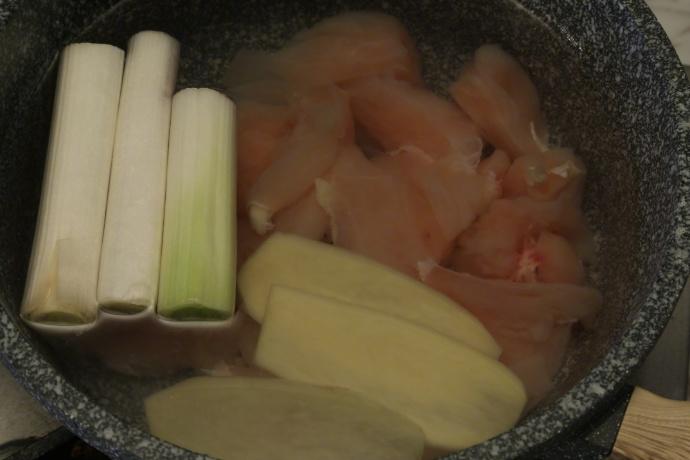
Step 3: Shred the Meat
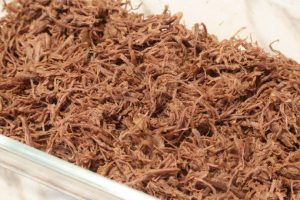
Drain the meat thoroughly. Remove the ginger and scallions. Place the cooked meat into a food processor or blender. Pulse until the meat is shredded into fine fibers.
Note: If you don’t have a machine, place the meat in a sturdy plastic bag and pound it with a rolling pin to loosen the fibers, then tear it apart by hand.


Step 4: Season
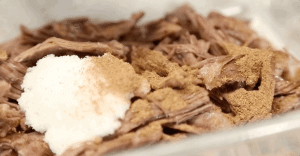
Transfer the shredded meat to a microwave-safe bowl. Add:
- 1 tbsp (10g) Sugar
- 1 tbsp (8g) Light Soy Sauce
- 1 tsp (5g) Five Spice Powder
Mix thoroughly until the seasonings are evenly distributed.

Step 5: The Microwave Method
Spread the meat out in the dish so it is in a thin, even layer. Do not pile it up.
- First Round: Microwave on High for 3 minutes. Carefully remove the dish (it will be hot) and stir well to redistribute the moisture.
- Second Round: Microwave on High for another 3 minutes. Remove and stir again.
- Check and Repeat: Check the texture. Is it dry and fluffy? If it’s still damp, continue microwaving in 1-2 minute intervals, stirring in between.
Important: Microwaves vary in power. Watch closely during the final minutes to ensure the meat floss doesn’t burn.
Step 6: Final Fluffing
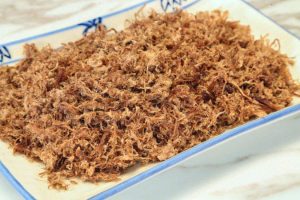
Once the meat is dry and golden, remove it from the microwave. While it is still warm, rub the floss between your palms to separate any clumps and create that signature “cotton” texture.
Optional: For an even finer texture (ideal for babies or picky eaters), give it one final quick blitz in the blender or food processor.

Our Systematic Test Kitchen Notes
We tested this recipe using Beef, Pork, and Chicken to see which yielded the best result.
- Beef: Our Winner. It has the most robust flavor and holds its texture well during the drying process.
- Pork: Very classic, but pork fibers are finer. Do not cut pork into small cubes before boiling; cook it in large blocks to preserve the fiber length.
- Chicken: The mildest flavor. It dries out the fastest, so reduce your microwave intervals by 1 minute to avoid burning.
Variations & Serving Suggestions
- Spicy: Add 1 teaspoon of chili flakes or chili powder during the seasoning step.
- Seaweed & Sesame: Once the floss is fully dried and cooled, mix in toasted white sesame seeds and crushed roasted seaweed (nori). This is delicious on rice!
- How to Serve:
- Breakfast: Top a warm bowl of plain congee.
- Baking: Use it to top Pork Jerky and Pork Floss Bread or fill soft milk buns.
- Snack: Eat it straight out of the jar!
How to Store
Let the meat floss cool completely before storing. Any residual heat will create condensation and cause mold.
- Room Temperature: Store in an airtight jar for up to 1 week in a cool, dry place.
- Fridge: Up to 1 month.
- Freezer: Up to 3 months.
FAQ / Troubleshooting
Q: My meat floss turned out hard and crunchy instead of fluffy. Why? A: This usually happens if the meat was overcooked in the microwave. The sugars can caramelize and harden. Next time, use shorter intervals and stop just before it feels completely bone-dry; it crisps up more as it cools.
Q: Can I use frozen meat? A: Yes, frozen meat works fine. Just ensure it is fully thawed before boiling so it cooks evenly.
Q: Is this safe for toddlers? A: Yes! Homemade meat floss is a popular first food for babies in China because it dissolves easily in the mouth. Just ensure you process it very finely in Step 6 and perhaps reduce the soy sauce slightly for lower sodium.
Nutrition Information (Per Serving – approx. 1/4 cup)
- Calories: 85 kcal
- Protein: 14g
- Carbohydrates: 3g
- Fat: 2g
- Sodium: 280mg
- Sugar: 2.5g
Disclaimer: Nutrition information is calculated using an ingredient database and should be considered an estimate. In cases where multiple ingredient alternatives are given, the first listed is calculated for nutrition. Garnishes and optional ingredients are not included.
Food Safety & Preparation Guide
1. Safe Internal Temperatures
Before proceeding to the drying step, meat must be fully cooked to the following USDA-recommended minimum internal temperatures:
- Poultry (e.g., chicken): 165°F (74°C)
- Pork and beef: 145°F (63°C)
2. Allergen Note
This recipe contains soy (soy sauce). If using regular soy sauce, note that it often contains wheat (gluten). For a gluten-free version, substitute with tamari or a certified gluten-free soy sauce.
3. Moisture Control & Storage
- Dry thoroughly before storing: Any residual moisture can lead to spoilage. If the floss feels cool or damp after drying, it needs additional drying time.
- Cool completely before sealing: Allow the floss to reach room temperature before placing it in an airtight container. Trapped heat will create condensation and shorten shelf life.
- Storage tip: Keep in a sealed jar in a cool, dry place.
4. Microwave Safety & Tips
- Use short bursts at the final stage: Because the floss contains sugar and soy sauce, it can burn easily once most moisture has evaporated. Toward the end, microwave in 1–2 minute intervals, stirring well between each.
- Stir frequently to prevent hot spots and ensure even drying.
- Container choice: Only use microwave-safe glass or ceramic bowls. Never use metal containers or utensils in the microwave.
Authoritative References
- USDA Food Safety and Inspection Service. “Safe Minimum Internal Temperature Chart.” United States Department of Agriculture. https://www.fsis.usda.gov/food-safety/safe-food-handling-and-preparation/food-safety-basics/safe-temperature-chart
- USDA Food Safety and Inspection Service. “Jerky and Food Safety.” United States Department of Agriculture. https://www.fsis.usda.gov/food-safety/safe-food-handling-and-preparation/meat/jerky
- Center for Food Safety (Hong Kong). “Production of Meat Floss and Food Safety.” The Government of the Hong Kong Special Administrative Region. https://www.cfs.gov.hk/english/multimedia/multimedia_pub/multimedia_pub_fsf_106_02.html
Final Thoughts
Making meat floss at home might seem like a project, but this microwave method makes it incredibly accessible. The flavor of homemade beef floss is significantly richer than the sweet, flour-filled versions you buy at the store. Plus, the smell of five-spice and soy sauce wafting through your kitchen is absolutely comforting.
Give it a try, and let me know in the comments if you prefer the Beef, Pork, or Chicken version!
Homemade Meat Floss (Rousong) – Microwave Method

Equipment
- 1 Microwave Essential for this quick method
- 1 Food Processor or Blender For shredding the meat
- 1 Microwave-safe glass dish Do not use metal
Ingredients
Main Ingredients
- 14 oz lean beef can substitute with pork loin or chicken breast (approx 400g)
- 1 stalk scallion for boiling (approx 5g)
- 2 slices ginger for boiling (approx 5g)
- 1 tbsp Shaoxing wine can substitute with dry sherry (approx 10g)
Seasonings
- 1 tbsp light soy sauce approx 8g
- 1 tbsp sugar white granulated sugar (approx 10g)
- 1 tsp five spice powder approx 5g
Instructions
- Rinse the meat. Cut beef into chunks (with the grain). If using pork or chicken, leave in larger pieces. Soak in a large bowl of cold water for 2 hours to remove impurities, changing water once.

- Place meat in a pot with cold water, scallions, ginger, and Shaoxing wine. Bring to a boil, skim foam, then simmer until tender (40 mins for beef, 30 for pork, 20 for chicken). A pressure cooker can reduce this time significantly.
- Drain meat thoroughly. Place cooked meat in a food processor or blender and pulse until finely shredded. Alternatively, place in a bag, pound with a rolling pin, and tear by hand.
- Transfer shredded meat to a microwave-safe dish. Add sugar, soy sauce, and five spice powder. Mix well to distribute seasonings evenly.

- Spread meat in a thin layer. Microwave on High for 3 minutes. Remove and stir. Microwave for another 3 minutes. Remove and stir. Check texture. Continue in 1-2 minute intervals until meat is dry and fluffy. (Stirring every 3 minutes is crucial for even heating).
- Once dried, rub the warm meat floss between your palms to fluff it up further. For a finer texture, pulse briefly in a blender again. Let cool completely before storing.






Leave a Reply